So you wanna learn how to draw a turkey? Well, buckle up because we’re diving deep into the art of creating one of the most iconic birds out there. Whether you're a beginner or someone who just wants to add some flair to their Thanksgiving decorations, this guide has got your back. Drawing a turkey doesn’t have to be complicated—trust me, I’ve seen people turn it into a masterpiece with just a few simple strokes. Let’s get started and unleash that inner artist hiding inside you!
Now, before we jump into the nitty-gritty details, let’s talk about why drawing a turkey is such a cool skill to have. Turkeys are not only symbolic of Thanksgiving but also fascinating creatures with unique features that make them stand out. From their feathery tails to their quirky wattles, every part of a turkey can be turned into an artistic masterpiece. And hey, if Picasso could do it, so can you!
Let’s set the scene: You’ve got your pencil, paper, and maybe even a cup of coffee by your side. This isn’t just about creating a turkey; it’s about expressing yourself through art. So grab your tools, clear your mind, and let’s turn that blank sheet of paper into something amazing. Ready? Let’s go!
Read also:Morgan Holly Moore The Rising Star You Need To Know
Why Learning How to Draw a Turkey is Worth Your Time
Okay, here’s the deal: turkeys might seem like plain old birds, but they’re actually super interesting to draw. They’ve got all these intricate details, like their fan-like tails and those colorful bits around their necks. Plus, mastering how to draw a turkey opens up doors to other types of bird drawings. Think about it—once you nail the basics, you can move on to peacocks, eagles, and even ostriches. It’s like leveling up in the world of art!
Another cool thing? Drawing turkeys is perfect for any occasion. Need a quick doodle for Thanksgiving cards? Done. Want to spice up your journal with some nature-inspired sketches? No problem. Or maybe you’re just looking for a fun activity to do with the kids. Trust me, they’ll love it. There’s something magical about watching a simple sketch transform into a full-fledged turkey right before your eyes.
Tools You’ll Need to Get Started
Before we dive into the actual drawing process, let’s talk about what you’ll need. Don’t worry, no fancy equipment required here. Just grab the basics:
- A pencil (HB or 2B works great)
- An eraser (because mistakes happen, and that’s okay!)
- A sheet of paper (any type will do)
- Colored pencils or markers (optional, but highly recommended)
- Your imagination (the most important tool of all)
Pro tip: If you’re feeling extra ambitious, consider using charcoal or pastels for a more dramatic effect. But hey, if you’re just starting out, stick with what makes you comfortable. Art is all about experimenting and finding what works best for you.
Understanding the Anatomy of a Turkey
To draw a turkey that looks legit, you need to understand its anatomy. Turkeys are made up of several key parts, each with its own unique characteristics:
- Head: Small and round, with a beak and those funky wattles hanging down.
- Body: Large and round, giving the turkey its iconic shape.
- Wings: Short and stubby, perfect for adding texture to your drawing.
- Tail: The star of the show! Turkeys have these gorgeous fan-like tails that spread out like a peacock’s.
- Legs: Thin and strong, designed for walking and scratching the ground.
Now that you know what you’re working with, let’s move on to the fun part: actually drawing the turkey!
Read also:Glossy Hair Bundles Transform Your Hair Game With These Stunning Extensions
Step-by-Step Guide: How to Draw a Turkey
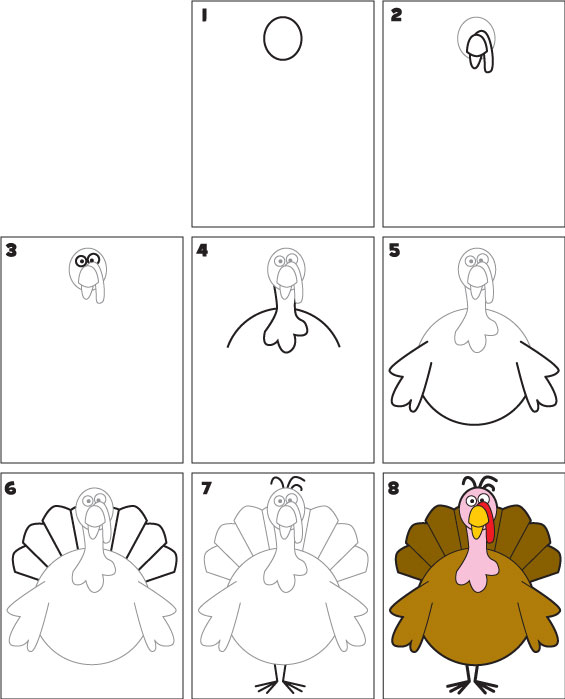
Step 1: Sketch the Basic Shape
Start by drawing a large oval for the body. This will serve as the foundation for your turkey. Keep it loose and don’t worry about perfection—remember, art is all about imperfection. Once you’ve got the body down, add a smaller circle on top for the head. Connect the two shapes with a curved line to create the neck.
Step 2: Add the Details
Now it’s time to bring your turkey to life. Start by adding the beak, which should be small and pointed. Don’t forget to include those quirky wattles—weird but totally essential. Next, sketch in the eyes, keeping them simple and expressive. Finally, draw the legs, making sure they’re proportional to the body.
Step 3: Create the Tail
The tail is where the magic happens. Draw a large fan-like shape extending from the back of the turkey. Break it down into individual feathers if you want to add more detail. This is your chance to get creative—feel free to experiment with different patterns and textures.
Step 4: Refine Your Drawing
Take a step back and assess your work. Are there any areas that need tweaking? Maybe the wings could use a little more definition, or the legs could be thicker. Use your eraser to clean up any mistakes and refine the overall shape of your turkey.
Step 5: Add Color
Finally, it’s time to bring your turkey to life with color. Turkeys come in a variety of shades, from brown and black to vibrant reds and blues. Use colored pencils or markers to add depth and dimension to your drawing. Don’t be afraid to mix and match colors—after all, turkeys are all about being bold and beautiful.
Tips and Tricks for Drawing a Perfect Turkey
Here are a few tips to help you create a turkey that’ll impress even the toughest art critics:
- Study real turkeys to get a better understanding of their anatomy.
- Practice sketching different poses to find what works best for you.
- Use shading techniques to add depth and dimension to your drawing.
- Experiment with different materials to see what gives you the best results.
- Most importantly, have fun! Art is about self-expression, so let your creativity shine.
Common Mistakes to Avoid When Drawing a Turkey
Even the best artists make mistakes, but here are a few things to watch out for:
- Making the head too big in proportion to the body.
- Forgetting to include the wattles—they’re what make turkeys so unique!
- Not paying attention to the tail—remember, it’s the star of the show.
- Overcomplicating the wings—keep them simple and understated.
By avoiding these common pitfalls, you’ll be well on your way to creating a turkey that’s both realistic and visually appealing.
Advanced Techniques for Drawing Turkeys
Once you’ve mastered the basics, it’s time to take your turkey-drawing skills to the next level. Here are a few advanced techniques to try:
- Experiment with different textures to add realism to your feathers.
- Play around with lighting and shadows to create a more dynamic composition.
- Try drawing turkeys in motion, capturing their movement and energy.
- Use watercolors or acrylics to add a painterly effect to your artwork.
Remember, art is all about pushing boundaries and exploring new possibilities. Don’t be afraid to step outside your comfort zone and try something new!
How to Draw a Turkey for Kids
If you’re drawing with kids, keep things simple and fun. Start with basic shapes like circles and ovals, and let them add their own unique touches. Encourage them to use bright colors and playful patterns to make their turkeys stand out. The goal here is to foster creativity and have fun, so don’t worry too much about perfection.
Final Thoughts: Keep Practicing and Have Fun!
And there you have it—a comprehensive guide on how to draw a turkey. Whether you’re a seasoned artist or just starting out, remember that practice makes perfect. Don’t be discouraged if your first few attempts don’t turn out exactly as you hoped. Every drawing is a learning experience, and with time and patience, you’ll be creating turkeys that look like they belong in a museum.
So what are you waiting for? Grab your pencil, paper, and let’s get drawing! And don’t forget to share your creations with the world. Art is meant to be enjoyed, so spread the love and inspire others to join you on this creative journey. Happy drawing!
Table of Contents
- Why Learning How to Draw a Turkey is Worth Your Time
- Tools You’ll Need to Get Started
- Understanding the Anatomy of a Turkey
- Step-by-Step Guide: How to Draw a Turkey
- Tips and Tricks for Drawing a Perfect Turkey
- Common Mistakes to Avoid When Drawing a Turkey
- Advanced Techniques for Drawing Turkeys
- How to Draw a Turkey for Kids
- Final Thoughts: Keep Practicing and Have Fun!