Alright folks, let’s get real for a second—tying a bow with ribbon is one of those skills that feels like it should be easy, but somehow always ends up looking like a tangled mess. Whether you're wrapping gifts, creating DIY decorations, or adding a fancy touch to your outfit, mastering this skill can seriously elevate your game. And guess what? Today, we’re diving deep into how to tie a bow with ribbon like a pro!
Let’s face it, not everyone was born with an innate ability to make perfect bows. Some of us struggle with the basics, while others just give up and call it “good enough.” But hey, that’s why you’re here, right? You want to learn how to tie a bow with ribbon that looks sharp, polished, and totally on point. And lucky for you, we’ve got all the tips, tricks, and step-by-step guides to help you conquer this art once and for all.
This article isn’t just about tying bows—it’s about empowering you to take control of your crafting destiny. So grab your favorite ribbon, settle in, and let’s make this happen. By the end of this guide, you’ll be tying bows like a boss and impressing everyone around you. Ready to dive in? Let’s go!
Read also:Easy Dinner Ideas For Two Delightful Meals To Spark Your Evening
Table of Contents
- Introduction to Tying a Bow with Ribbon
- Understanding the Basics of Ribbon Bows
- Tools and Materials You’ll Need
- Step-by-Step Guide: How to Tie a Bow with Ribbon
- Common Mistakes to Avoid
- Different Types of Ribbon Bows
- Customizing Your Ribbon Bow
- Troubleshooting Your Bow-Tying Woes
- Practical Applications of Ribbon Bows
- Wrapping It All Up
Introduction to Tying a Bow with Ribbon
First things first, tying a bow with ribbon might seem intimidating, but it’s actually pretty straightforward once you get the hang of it. Think about it—this is one of those skills that can turn a simple gift into something extraordinary. Imagine handing someone a present wrapped in sleek, perfectly tied ribbon. It’s not just about the bow—it’s about the effort and thought behind it.
There’s a reason why bows are so popular in crafting, decorating, and even fashion. They add a touch of elegance, personality, and flair to almost anything. Whether you’re wrapping a birthday gift, decorating a wedding venue, or accessorizing a headband, knowing how to tie a bow with ribbon opens up a world of possibilities. And honestly, who doesn’t love a good bow?
Understanding the Basics of Ribbon Bows
Before we dive into the nitty-gritty, let’s break down the basics. A ribbon bow is essentially a decorative knot made from ribbon. It’s all about creating loops, pulling strings, and adjusting until you achieve that perfect shape. Sounds simple, right? Well, it is—but there are a few key factors to keep in mind.
Choosing the Right Ribbon
Not all ribbons are created equal. The material, width, and texture of your ribbon can make a big difference in how your bow turns out. Here are a few things to consider:
- Satin Ribbons: These are smooth, shiny, and great for formal occasions. They hold their shape well and look super polished.
- Fabric Ribbons: Think velvet or grosgrain. These ribbons have more texture and are perfect for rustic or vintage looks.
- Wire-Edge Ribbons: If you want your bow to stay in place without slouching, wire-edge ribbons are your best bet. They’re easy to manipulate and hold their shape beautifully.
Pro Tip: Always choose a ribbon that complements the occasion or item you’re decorating. For example, a shiny satin ribbon might look out of place on a rustic wooden box.
Tools and Materials You’ll Need
Now that you’ve got your ribbon picked out, it’s time to gather your tools. Here’s what you’ll need to get started:
Read also:What Does Loml Mean Unlocking The Hidden Meaning Behind This Trending Slang
- Ribbon (duh!)
- Scissors (sharp ones, preferably)
- A hot glue gun or craft glue (optional, but helpful for securing your bow)
- A ruler or measuring tape (if you want your loops to be even)
Don’t stress too much about having all these tools—most of them are probably already lying around your house. But if you’re serious about mastering the art of tying bows, investing in a good pair of scissors and a hot glue gun can make a huge difference.
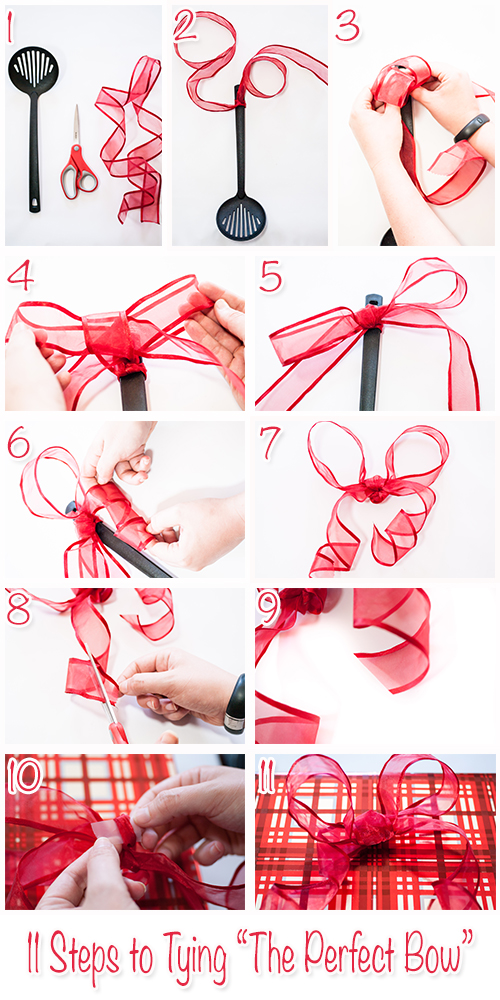
Step-by-Step Guide: How to Tie a Bow with Ribbon
Alright, this is the part you’ve been waiting for—the step-by-step guide to tying a bow with ribbon. Follow along carefully, and you’ll be tying perfect bows in no time.
Step 1: Measure and Cut Your Ribbon
Decide how big you want your bow to be, and cut your ribbon accordingly. A good rule of thumb is to cut your ribbon about twice as long as the desired bow size. So if you want a 6-inch bow, cut your ribbon to about 12 inches.
Step 2: Create the First Loop
Take one end of the ribbon and form a loop with it. Hold the loop in place with your thumb and forefinger.
Step 3: Create the Second Loop
Take the other end of the ribbon and create a second loop, crossing it over the first loop. Make sure both loops are roughly the same size.
Step 4: Tie the Bow
Take the tail of the ribbon (the long end) and wrap it around the center of the loops. Then, tie a knot to secure the loops in place. Tighten the knot gently, making sure the loops stay in shape.
Step 5: Adjust and Fluff
This is the fun part! Adjust the loops and tails until they’re even and symmetrical. Give your bow a good fluff to make it look full and fluffy.
And there you have it—a perfectly tied bow! Wasn’t that easy?
Common Mistakes to Avoid
Even the best bow-tiers make mistakes sometimes. Here are a few common pitfalls to watch out for:
- Not Cutting Enough Ribbon: If your ribbon is too short, your bow won’t have enough material to form proper loops. Always err on the side of caution and cut a little extra.
- Tying the Knot Too Tight: A tight knot can distort the shape of your bow. Leave a little wiggle room so you can adjust the loops later.
- Ignoring Symmetry: A lopsided bow can ruin the whole look. Take the time to adjust your loops and tails until everything is even.
Remember, practice makes perfect. The more you tie bows, the better you’ll get at avoiding these mistakes.
Different Types of Ribbon Bows
Did you know there are different types of ribbon bows? Here are a few popular styles to try:
1. Classic Bow
The classic bow is simple, elegant, and versatile. It’s perfect for wrapping gifts, decorating packages, or adding a touch of charm to any project.
2. Poinsettia Bow
This fancy bow is made by layering multiple loops on top of each other. It’s often used in floral arrangements and holiday decorations.
3. Wired Bow
Wire-edge ribbons make it easy to create structured bows that hold their shape. These bows are great for outdoor events or windy conditions.
Experiment with different styles to find the one that works best for your project. The possibilities are endless!
Customizing Your Ribbon Bow
Once you’ve mastered the basics, it’s time to get creative. Here are a few ways to customize your ribbon bow:
- Add Embellishments: Glue on beads, sequins, or rhinestones for an extra touch of sparkle.
- Use Patterns: Choose ribbons with patterns or textures to add visual interest.
- Layer Bows: Stack smaller bows on top of larger ones for a multi-dimensional look.
Don’t be afraid to think outside the box. After all, crafting is all about expressing your creativity.
Troubleshooting Your Bow-Tying Woes
Let’s face it—sometimes things don’t go as planned. Here are a few solutions to common bow-tying problems:
- Slouchy Bow: If your bow won’t hold its shape, try using wire-edge ribbon or adding a dab of hot glue to the center.
- Uneven Loops: Adjust the loops carefully until they’re symmetrical. It might take a few tries, but it’s worth it.
- Fraying Edges: Use a lighter or fabric sealant to prevent your ribbon from fraying.
With a little patience and persistence, you can overcome any bow-tying challenge.
Practical Applications of Ribbon Bows
Now that you know how to tie a bow with ribbon, it’s time to put your skills to use. Here are a few practical applications:
- Gift Wrapping: Add a bow to any gift for an instant upgrade.
- DIY Decorations: Use bows to embellish wreaths, garlands, or centerpieces.
- Fashion Accessories: Attach a bow to a headband, scarf, or necklace for a fun and flirty look.
The more you practice, the more confident you’ll become in applying your bow-tying skills to different projects.
Wrapping It All Up
And there you have it—everything you need to know about how to tie a bow with ribbon. From choosing the right ribbon to customizing your bows, we’ve covered all the bases. Remember, tying a bow is more than just a skill—it’s an art form. With practice, patience, and a little creativity, you can create bows that are truly one-of-a-kind.
So what are you waiting for? Grab your ribbon and start tying! And don’t forget to share your creations with us in the comments below. We’d love to see what you come up with. Happy crafting, folks!